
Learn Different Build Techniques - Fusion 360 Modeling
Apr 10, 2022Five Design Approaches
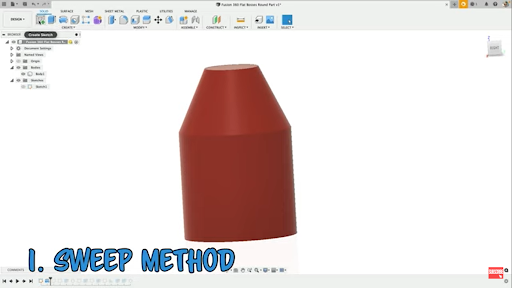
1. Sweep Method
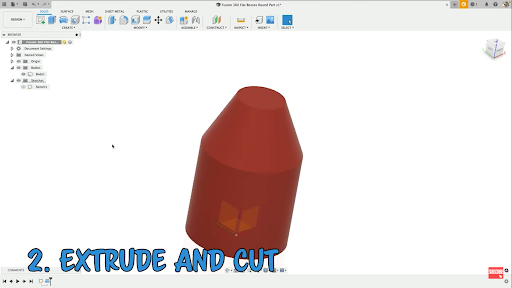
2. Extrude and Cut
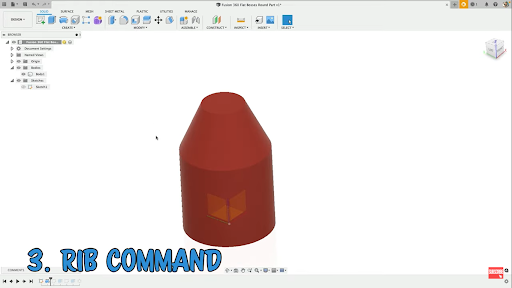
3. Rib Command
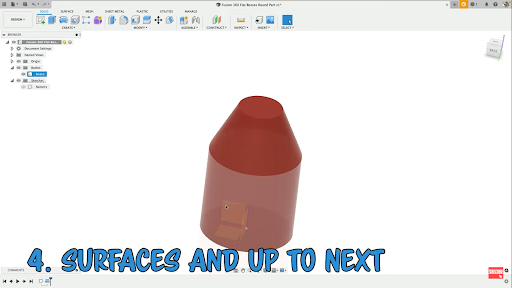
4. Surfaces and Up to Next
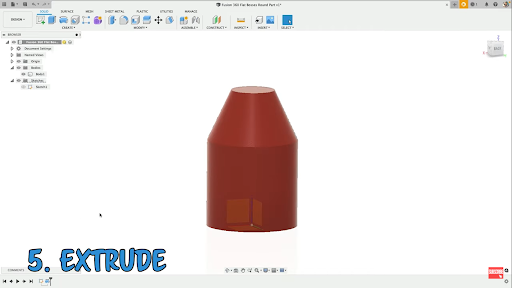
5. Extrude
 Get More Fusion 360 Tips & Tricks
Check out the video and the video transcription below
Speaker 1 (00:00):
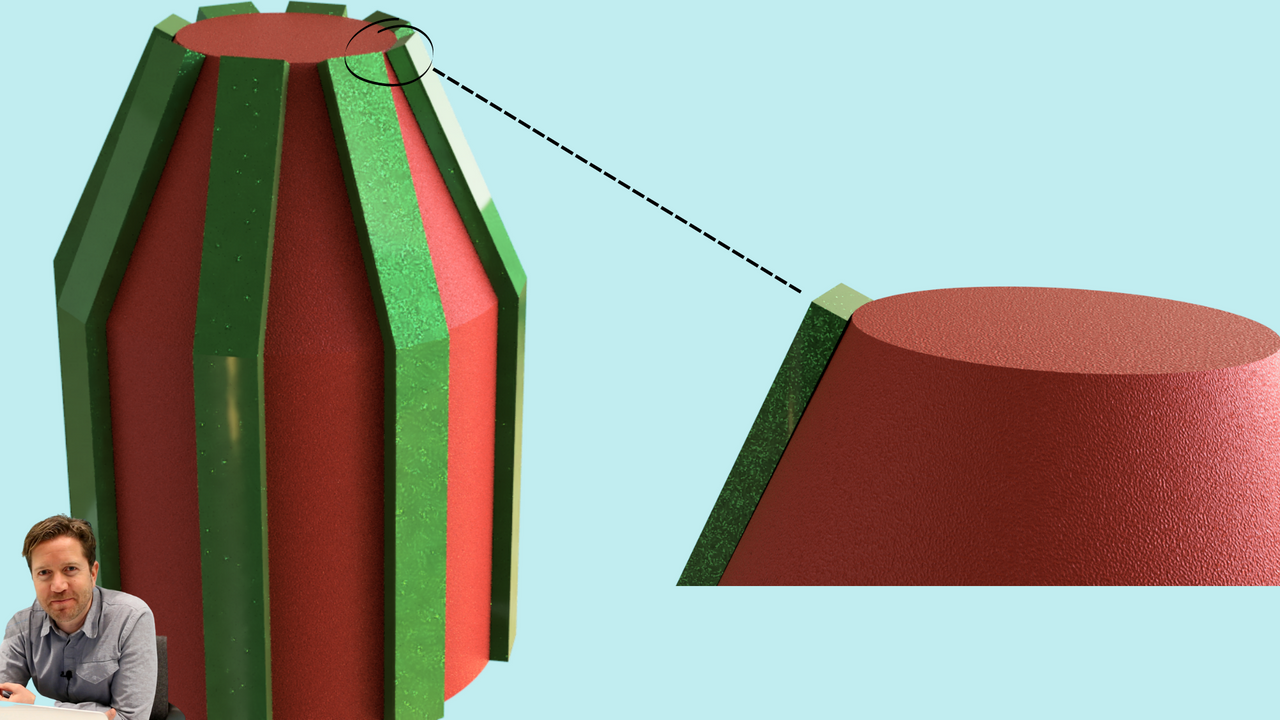
By the end of this video, you're gonna see five different ways of accomplishing this design.
Speaker 1 (00:08):
Hey, Tyler, Beck of Tech and Espresso. This video is inspired by fusion 360 schools video. I loved what he did here, and I took some time to see if I could add any additional ways to build the same thing. So here we go. Five different ways, starting with a simple revolve. This shape. What I wanna do first is the sweep and the sweep is two sketches. Two profiles. I'll do a profile at the bottom and you could do a just simple outline. And that's actually what I think is shown in that other videos, just come up and sketching a line and then sketching another, And then doing this profile. The one got you here is it's gonna pull away from the upper profile. So let's show that real quick and show how to fix it. So now we need a path. What's the easiest way to sketch a line on this face. Now we could do a simple sketch come to the right plane, Sketch that shape that'll work, or you can use project. Now, one got you with these round objects is the edge. Doesn't wake up because it's round instead, come over, choose bodies, select that bodies and it will project and draw those edges for you. Very cool. Now I have too many extra projected edges. I'm gonna select those with my window, select hit, delete. And now all I have left is the ones that I care about for the path. I now effectively have two sketches at will sweep go to sweep command,
Speaker 1 (01:46):
And we've got the profile that follows a path. Now here's the gotcha. I mentioned earlier, it's pulling away because it's not intersecting at this round face. So what can we do in our profile? Something to be aware of. You want to just go ahead and complete this and drag this in. And we, we could just delete this and replace it with the rectangle. Take the time to get this centered, turn on the origin, use the construction planes. However you like to center things. I'll sketch to the point here. Choose that line, make that the midpoint that looks great, hit accept. And now what we want to do is redo that sweep. Make sure that the whole profile is selected the path. Make sure that it's joining And look at your options. Wanna make sure that it's set to parallel. If you see yours kind of coming up and over, come over to your orientation. It's like parallel looks great. And we want to confirm that the sweep will pattern. It's a circular pattern. The feature is the sweep, and we're gonna pattern along this axis. All right. Number two, a simple one. Let's do an extrude and then chop it away. All right. So we'll do sketch
Speaker 1 (03:14):
Rectangle. I'm gonna connect it to the bottom and I'll make sure that the center point is already ready to go. That point, this line will make that midpoint it's lined up and centered. Great. Okay. So I'm gonna extrude this coming out, Make sure that it's joined And you can overdo it. And then we're gonna clean up the profile with a cut, come in from the side, start a sketch. And this sketch line, you need to define the outer of your design profile. So come in, add your dimensions, add your constraints to get this lined up, just how you want it. And then we can cut away this material material or this excess material there.
Speaker 1 (04:05):
Now one gotcha. Is the pattern. So this is a super simple way to do it, I think, but it took two steps. And now for the pattern, that's the warning is make sure that you get the solid body and the cut in the objects that you want to Fe and want a pattern. That's one gotcha for that one. Well, the optimized work does, there we go. All right. Number three, using the rib command. So I love the rib command. It's a little weird for this one because we need boundaries to work off of. So I need to have some boundaries for it to extend to up top. And so I can just do a simple circle and extrude that And we'll join it. Make sure it's joined. You wanna extend the body? And same thing goes for this one, start a sketch, add some sort of boundary at the bottom.
Speaker 2 (05:02):
The,
Speaker 1 (05:02):
And then we'll get rid of this in a little bit, Make sure that you choose join. I left that off. All right. So now you can come in from the side and do that rib profile. So select that plane to sketch on, and I'm gonna sketch the rib that I want, just the outer shape. And what's nice about this is it will update nicely and we get a little more control over it once we start it. So we'll choose rib command And look at what it's doing there. It's extend up. That's not actually, I wanna go one side and we'll come down much better and actually let's do symmetric. So it's extending on both sides and finishing out looks good, hit, okay. And now a few different ways we could come in and just do E for extrude and come in and make a cut same depth to match. Or you can use delete on your keyboard and use fusion to delete the faces. So you clean that up. So I don't love that extra work of the boundaries, but I love how this rib feature is editable and adjustable. And number four, let's do a thin feature or a surface on the outside that we'll use as a boundary. So what we'll do first is sketch that rectangle in the interior like we did before
Speaker 1 (06:42):
Sketch that shape, going up, Add the relationship or
Speaker 2 (06:50):
Constraints,
Speaker 1 (06:51):
Select that point and that line make them line up Midpoint. Great. So what I want to do is extrude this, but I need a surface on the outside for it to hit. So coming in from the side perpendicular to the face, we just did, We'll start a sketch and we'll do a line and I'm gonna overlap a little bit. This is the outer boundary of our extrusion that we want to go to. So add your dimensions and relationships and constraints, get this lined up, how you want it. And then let's do a surface extrude or just an extrude. I'll use the orange for surface. I'm gonna extrude it both ways. And then we'll extrude the other body to hit it. So we'll hit and extrude this interior, and we want it to come up to this face, but we're gonna need to make sure that we choose up to an object And, and we want to use The adjacent faces. So it's solving off of both. Well, join and then come find your surface body and turn that off. All right. Number five, I think the most elegant and simplest, here we go, Come in from the side, the side of the profile that you want
Speaker 1 (08:29):
And start a sketch. I'm gonna use P for project and I'm gonna sketch these outer lines just so I've got that to dimension off of and do my relationships and constraints And make sure I use the browned bodies. So I have these outer edges. Great. So what I want to sketch coming, starting pretty far in, come out, Come down, Connect it up. I can make these vertical and it looks like I messed up just a little bit. Let's try that again. There we go. Sketch that line coming down and there we go and over. Okay. So I've sketched the shape plus a lot of excess or extra material and that'll work because this is a solid. Now, if this was hollowed out and we need to do it, it'd be a little bit different approach. Come in, add my dimensions that I care about. Add any constraints that I care about, Make these parallel, whatever we're trying to solve, get it lined up how you want. And now we're gonna do an extrude with the whole profile. The interior and outer coming out will maybe make, set this to symmetric and join it. And there we go. So that's probably the simplest and fastest way you could have done that one. And then we'll add that circular pattern.
Speaker 1 (10:06):
Hey, if you can think of a better way to do this design, I'd love to hear it. Shoot me an email. I'll put that down below or go over to tech and espresso.com and drop me in line. Let me know what you came up with. I'll see you guys in the next video.
