
Beginner Tutorial P Bracket
Jun 01, 2020
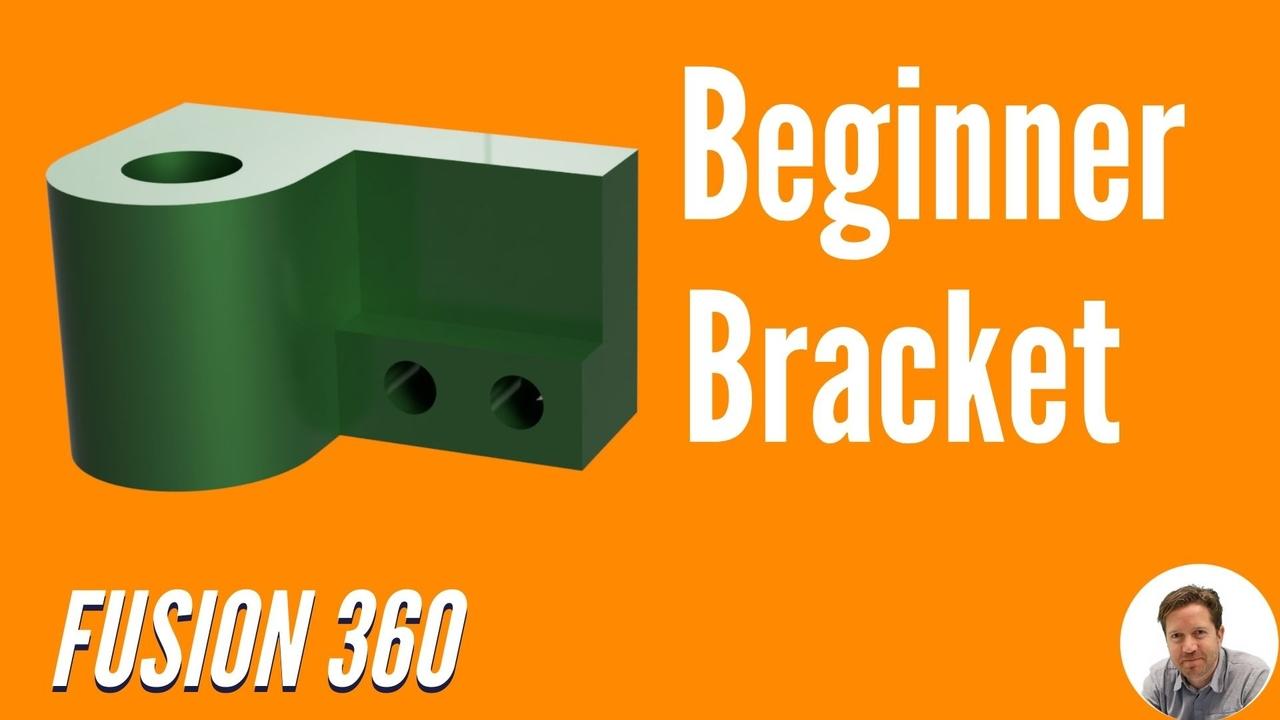
How do you model this in Fusion 360 coming up
Hey, Tyler Beck with tech and espresso today, we're going to be modeling this in Fusion 360. So if you'd like to fall along, here's the dimensions and a drawing. And if you want to download this, I'll put that down below where you can download this one, as well as all my other exercises for practice. Okay. So starting a brand new file or design and Fusion 360, I'm gonna make sure the units are in what I want to work in, which is in this case millimeter.
(00:39):
So we think of a strategy for this file. Uh, what is the most important profile or maybe what profile would capture the most information? If we were to start with it, would it be doing a rectangle and extruding that, and then doing a rectangle then coming from the top and cutting this off, or would it be sketching this profile? And then, you know, adding an extruded boss, I'd say it's like that, but probably the best practice or simplest would be to start the sketch on the top points. So I'm going to start with, what I'm going to do is I'm going to start from the origin, come down, draw a line, sketch a line, go to an arc. And I do that by clicking and dragging the line, sketch the rest mines, and I'm a little off. So the first thing I want to do is I'd like to add all the proper constraints first, then dimensions. I'm gonna select this line and make it a horizontal line. This one's already perpendicular. There's that relationship. Are there any other relationships or constraints I should add? I don't think this went to a tangency. I don't see the tangent constraint. So select line and arc and choose tangent that ensures a nice, smooth transition. And now I'm going to start by adding some smart dimensions D on the keyboard, and I'm going to place this entity, this whole entity, this line is 90. And then I know this depth to be 28. I know this radius
(02:22):
to be 22 and I have a whole, but I'm going to separate the whole into another sketch and feature. We could go ahead and do it because this is a simple enough model, but for good best practices, I'm going to separate the sketches. Okay? What are we missing? This overall height? Well, I know this height is 38. Now, what if you knew the height from the top to this bottom arc, I'm going to show that real quick and then we'll bring it back. So what I'm gonna do is dimension to the arc. I'm going to right click on the arc and choose the arc tangent, select it, dimension to this line. And now it's dimensioning from the line to that outer arc. I love that. That's a cool capability. Now I'm going to keep it just as a reference and a right click and make it driven.
(03:13):
Driven just means it's more of a measurement. It's not something driving how the model behaves or parametric. This one is now parametric. So if I change it, it changes it. But if I double click on this one, it doesn't do anything again. Just reference measurement, that type of thing. Next let's extrude this going up. So I'm going to hit E for extrude, select this profile. We're going up at 50 millimeters looks great. Hit, okay. Go to the home view. It's looking good. So few other little steps to make select the face. So I like to select a face or a plane, start a sketch, and now I'm going to do a rectangle and a rectangle drop it in. And it did snap to that line. So it looks like it knows its total width is now tied to that edge to edge and the height is what's missing.
(04:12):
So if I select that entity, place it at 20 and we'll extrude that, and that should be 10 and it looks like I messed up. I misread a dimension. So this is a good excuse to come back and fix it. So if you're like me and you misread it or did it wrong, how do you fix things like this? This is a great excuse to come look at the timeline. This is the original sketch and maybe an empty sketch. So let's go to the first sketch nothing in that I could probably delete that. Let's do that. Delete it right. Click on the first sketch. Choose edit, sketch. Alright, great. This is the power of parametric design because I messed up and did this wrong. I can now make this 18. There we go. That looks better. Hit update or finish. And this then comes off at 10. So everything updated and let's just do a quick measure. I'll select the face and the other face. What's the distance 28 millimeters. Just like it should be. Hopefully that was helpful for you to show a mistake and show it fixing. And you're welcome to beat me up in the comments. Always love getting beat up there next let's do some holes like the face. Start a sketch, the sketch, some circles. So many use the S key S for search search for circles. And it wakes up all my different styles that I could use.
(05:43):
I'll just do the center drop a couple in now. What relationships or constraints should I set up? First? These two center points are always horizontal. Next to arcs. They're equal. What's the diameter. The diameter is 10 dimension from the edge. It's 12 distance to here. It's 20 height from the center to the bottom is 11 and then it's a through all hole. So hit extrude and go all the way through and make sure it's all. And that makes it intelligent. Make sure both are selected. So that cuts both at the same time. And there we go. What else am I missing? I shouldn't, the next thing is the hole. So I could do this at the bottom or I could do on this top face. I'm going to hover near this arc and it helps wake up. That center point of the arc could also add that as a constraint. The dimension is 20 diameter E for extrude. We're going all the way through. So Hey, if you're looking for more exercises and tutorials on getting started, check out this beginner's playlist, as well as this video that YouTube says you'll enjoy. Thanks for watching. See you in the next video.
